DIY LEGO chest of draws
- Ash Garrard
- Apr 15, 2022
- 2 min read
Updated: Apr 8, 2025
Got an old piece of furniture lying around? Don’t chuck it — upcycle it! I turned an old chest of drawers into a bright LEGO-themed storage unit that’s perfect for kids' rooms. Here’s how I did it.

Materials
Spray primer (1 can)
Spray paint (5 bright LEGO colours)
Pallet wood (for handles)
Wood glue
Tools
Drill/screwdriver
Sander
Jigsaw (or bandsaw if you’ve got one)
The Prep
I removed all the old handles and sanded everything down to get rid of scratches and varnish. A smooth surface is key — especially when painting bold colours.


The forgotten chest of drawers that kicked off this project
Prime & Paint
I didn’t want the wood grain showing (LEGO doesn’t have grain!), so I gave it a generous coat of primer. Once dry, I masked off my “brick” layout and sprayed each section in bright colours. Mix up your layout for that stacked-brick look!
Tip: Use painter’s tape and spray light coats to avoid bleeding.


Masked off each 'brick' and sprayed in bright LEGO colours.
Make Lego Stud Handles
To mimic LEGO studs, I glued pallet boards together for thickness, then rough-cut 1½" circles (20 of them!).
Used a bandsaw and bench sander for speed, but a jigsaw works too. You could buy dowel — but pallet wood is free and satisfying to work with.


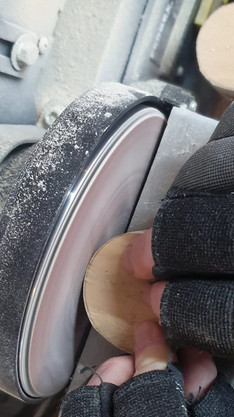


DIY LEGO studs! Glued pallet wood, cut circles, sanded smooth.
The Snag

One area repelled the paint due to an old spill soaked into the wood. Took it back to bare wood, cleaned with white spirit, re-primed, and re-sprayed — fixed!
Outline & Assemble
Used a black acrylic paint pen to outline the bricks and cover any spray overlap. Then I attached the wooden handles.


A paint pen helped sharpen those colour edges and hide any bleeding.
Finish Strong
Two coats of lacquer gave it that classic LEGO gloss and protected it for use in a kid’s room.
And that's it
A forgotten chest of drawers transformed into a LEGO storage masterpiece — ready for toys, socks, and everything in between.
👉 Feeling inspired? Check out more projects at www.thecraftywoodshed.co.uk


From dusty to display-worthy! Perfect for any LEGO lover’s room.
Comments